
Recurring drainage issues can leave any Poole homeowner feeling frustrated when water pools and unpleasant odours return again and again. Many properties in Poole have older drainage systems where traditional clearing methods often fall short. By understanding modern CCTV survey techniques, you gain the ability to accurately diagnose what is really happening underground. This guide explains equipment essentials, safe access points, and effective steps so you can assess blocked drains and make smart decisions for your home.
Table of Contents
- Step 1: Prepare Essential CCTV Survey Equipment
- Step 2: Locate and Access Drain Inspection Points
- Step 3: Insert and Navigate the CCTV Camera
- Step 4: Record Footage and Note Key Findings
- Step 5: Review Results to Confirm Drain Condition
Quick Summary
| Key Insight | Explanation |
|---|---|
| 1. Gather the right CCTV equipment | Ensure you have high-resolution cameras, adequate lighting, and flexible cables to conduct effective drain surveys, especially in challenging conditions. |
| 2. Identify access points before starting | Locate inspection chambers and manholes in your drainage system to ensure smooth insertion and operation of your CCTV equipment. |
| 3. Document findings during the survey | Record footage continuously and take notes on blockages and structural issues to create a comprehensive diagnostic record for further action. |
| 4. Review footage thoroughly post-survey | Carefully analyse recorded footage to determine blockage types and pipe conditions, which helps in deciding if professional assistance is needed. |
| 5. Prioritise safe equipment handling | Always handle equipment carefully in potentially hazardous areas, ensuring safety before proceeding with camera insertion and navigation. |
Step 1: Prepare essential CCTV survey equipment
Before you start any drain survey, you’ll need to gather and verify the right equipment. Getting this right at the outset saves you time, prevents frustrating delays, and ensures you capture clear footage that actually helps you identify blockages accurately. Poole’s older drainage systems often present challenging inspection conditions, so having reliable equipment isn’t just convenient, it’s essential for thorough diagnosis.
Start by checking your camera system is fit for purpose. You’ll need a camera designed for drain work, not just any CCTV unit. The camera should feature high resolution output to capture fine details of pipe damage, debris accumulation, and blockage locations. CCTV equipment must comply with professional installation standards that ensure clear image capture even in tight, dark spaces. Pair this with adequate lighting systems. Drains are pitch black, and without proper illumination, your camera sees nothing useful. LED lighting integrated into the camera head or separate lighting rigs will dramatically improve image quality and help you spot problems you’d otherwise miss.
Next, consider your cable reel and push rod system. The length of your drain run determines the cable length you’ll need. Most residential surveys in Poole require 30 to 100 metres of cable, though older properties with longer main runs might need more. Your cable reel should be robust enough to handle repeated deployment without tangling or fraying. The push rod itself needs to be flexible yet strong enough to navigate bends and negotiate past minor obstructions without snagging.
Your monitoring equipment matters more than many homeowners realise. A quality monitor lets you watch the camera feed in real time, meaning you’ll spot blockages, root ingress, cracks, and debris as you push the camera through. This real-time viewing is absolutely crucial for understanding exactly where problems occur and how severe they are. You can also record the entire survey for documentation and future reference.
Don’t overlook storage and cable management. Drain cameras and cables attract moisture, sediment, and unpleasant residues. You’ll need secure, clean storage facilities that protect your equipment between surveys. Properly stored equipment stays functional for years; neglected equipment fails when you need it most. Additionally, ensure you have appropriate data protection measures for recorded footage, even for residential drain inspections, to comply with data protection standards.
Consider these key items before starting:
- High-resolution colour camera unit designed specifically for drain work
- LED lighting system integrated into or accompanying the camera
- Cable reel with at least 50 metres of flexible, durable cable
- Real-time monitor or viewing screen for live feed observation
- Recording capability for documentation and record-keeping
- Cleaning and maintenance supplies for equipment care between surveys
- Secure storage solution protecting cables and camera from moisture and damage
Pro tip: Test all equipment in daylight on a short, accessible drain run before attempting longer or more complex surveys, ensuring your camera, cable, and monitor work together seamlessly and you’re comfortable operating them.
Step 2: Locate and access drain inspection points
Finding the right access points is where many homeowners stumble. Without these inspection chambers or manholes, you cannot insert your CCTV camera into the drain system at all. Identifying and safely accessing these points determines whether your survey will succeed or whether you’ll be left frustrated on your property with expensive equipment but nowhere to deploy it.
Start by understanding what you’re looking for. Inspection chambers are rectangular or circular access points built into your drainage system, typically found at ground level in your garden, driveway, or under the property itself. They’re designed to allow safe access for maintenance and inspection. Look for slightly raised or sunken concrete lids, often circular metal covers, or rectangular concrete boxes with removable lids. Older Poole properties sometimes have brick-built chambers that have weathered considerably, making them harder to spot beneath overgrown vegetation or accumulated soil.
UK drainage regulations require inspection points positioned at regular intervals and near pipe direction changes to facilitate exactly this kind of survey work. Once you’ve located these points, you need to plan your camera route carefully. Most properties have a main inspection chamber near the property boundary, where the internal drainage connects to the public sewer. Intermediate chambers exist along longer runs, particularly where pipes change direction or junction with other lines.
When you find a chamber, safely access it before inserting any equipment. Remove the lid carefully, checking for loose debris or unstable edges. Never rush this part. Your safety matters more than speed. Look inside with a torch to assess the chamber’s condition. You’re checking for standing water, sediment buildup, tree roots, or obvious blockages. This preliminary inspection tells you whether the blockage occurs before or after this point, helping you target your camera correctly. If the chamber contains water, ensure proper drainage before inserting equipment, as moisture damage ruins cameras quickly.
When planning your survey route, consider these inspection point guidelines:
- Main external chamber typically located at or near the property boundary
- Intermediate chambers positioned every 30 to 50 metres on longer drain runs
- Junction chambers where branch drains meet the main line
- Direction change points where pipes alter course significantly
- Internal chambers sometimes located within cellars or under kitchens in older properties
Sequence your camera deployment strategically. Start from the furthest upstream point accessible and work your way downstream towards the public sewer connection. This approach helps you identify exactly where blockages occur and whether they’re multiple problems or a single severe obstruction. Document the chamber locations on a simple sketch or photograph for future reference, as you’ll want to know which chamber to access if the blockage recurs.
Properly locating and documenting inspection points saves you time during the survey and provides invaluable reference data for future maintenance or professional drainage work.
Consider potential safety issues before proceeding. Some older properties have inspection chambers positioned in awkward locations—beneath patios, in flooded areas, or in confined spaces. If access looks genuinely hazardous, this is the moment to call a professional drainage surveyor rather than risk injury or property damage.
Pro tip: Mark your inspection chamber locations with temporary paint or tape before starting your survey, allowing you to quickly identify which chamber you’re using without repeatedly removing lids and breaking your workflow.
Step 3: Insert and navigate the CCTV camera
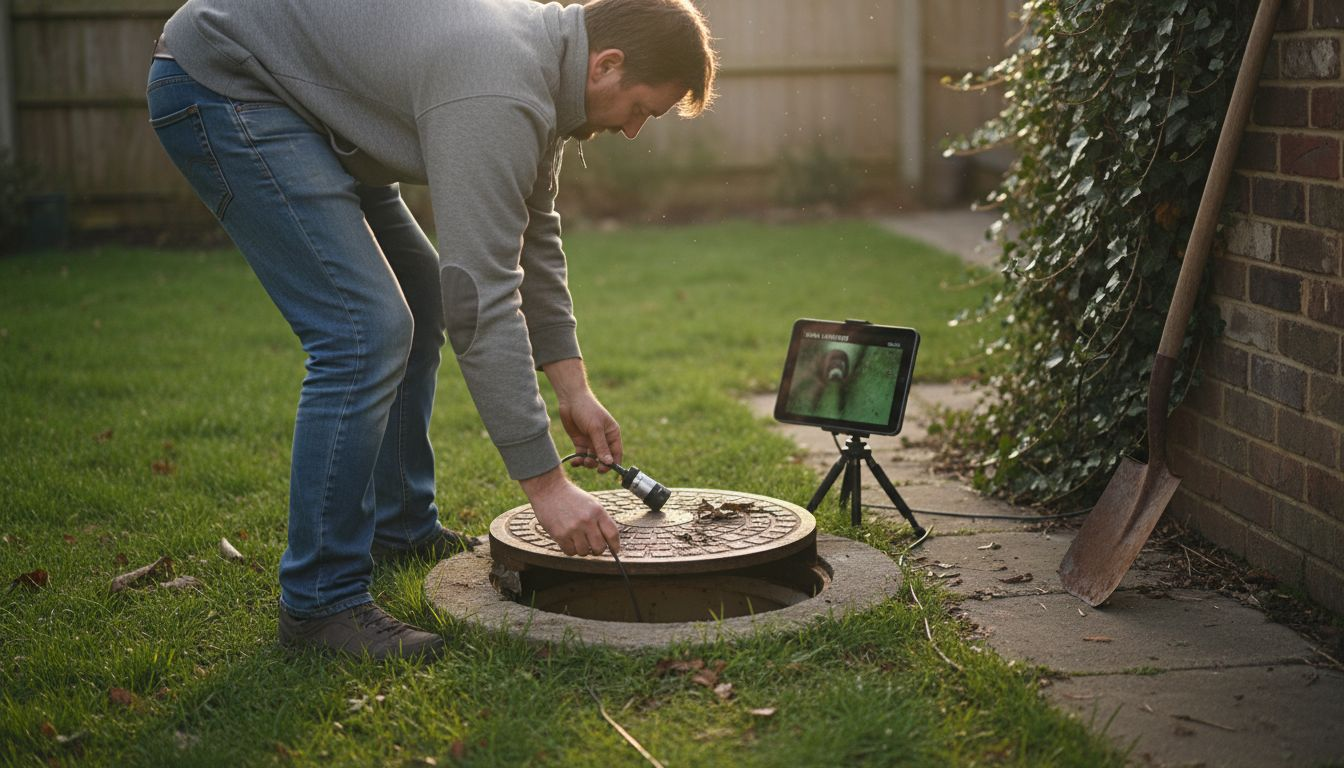
This is where your preparation pays off. You’re about to feed your camera into the darkness and guide it through your drainage system, watching in real time as it reveals exactly what’s causing your blockage problem. Getting this step right demands care, attention, and a methodical approach, but it’s entirely manageable for a homeowner willing to work slowly and deliberately.
Before you push anything into the pipe, verify your equipment one final time. Check that your camera powers on, your monitor displays a clear image, and your cable feeds smoothly through the reel without kinks or resistance. This takes five minutes now and saves you from discovering equipment failure halfway through your drain. Position your monitor where you can watch it comfortably throughout the survey, ideally propped up or held steady on a stable surface. You’ll be staring at this screen for the next hour or more, so comfort matters.
Now approach the inspection chamber you’ve selected as your starting point. Gently insert the camera head into the drain opening, taking care not to force it. The camera should slip into the pipe smoothly. If you encounter resistance, stop immediately. You’ve either hit an obstruction (which is exactly what you’re looking for, but forcing the camera damages equipment) or you’re pushing at an angle that won’t work. Adjust your approach and try again. Once the camera enters the pipe, you should see the drain interior appearing on your monitor. Drains are dark environments, so your LED lighting is now working hard to illuminate the pipe walls, sediment, and any blockages ahead.
As you push the camera deeper, watch your monitor constantly. Skilled operator technique requires monitoring real-time video feeds to navigate bends and identify obstructions whilst managing cable carefully. You’re looking for several things simultaneously: the pipe condition itself, debris accumulation, tree root ingress, cracks or fractures, and most importantly, where the blockage sits. Push steadily but never rush. If your cable starts feeling resistance, pause and assess. Is the camera hitting a bend or an actual blockage? A gentle nudge past a bend feels different from hitting solidified grease, roots, or foreign objects.
Your cable management directly affects success. Keep tension moderate on the reel as you push forward. Too much tension tangles the cable; too little allows it to bunch up inside the pipe. Work with a steady, deliberate pace, advancing the camera perhaps half a metre at a time, observing what you see before pushing further. This methodical approach lets you identify exactly where problems occur rather than blasting through and missing crucial details.
When you encounter a blockage, stop advancing and document what you’re seeing. Record video footage if possible, noting the blockage type and severity. Is it roots, grease, debris, collapsed pipe sections, or something else entirely? This information proves invaluable for deciding your next steps. Some blockages you can attempt to break through gently; others require professional clearing equipment. Never force the camera through a blockage as this damages the equipment and accomplishes nothing.
Navigate bends carefully by watching your monitor. The camera head typically has a slight curve, and following bends requires gentle steering through cable pressure and controlled pushing. You’ll develop a feel for this as you work. Here’s what to monitor throughout your survey:
- Pipe interior condition including cracks, fractures, or structural damage
- Debris types such as grease buildup, tree roots, soil, or collapsed sections
- Blockage location precisely where the obstruction begins and ends
- Pipe diameter changes indicating junctions or section transitions
- Previous repair work such as patches or relining sections
As you progress downstream towards the main sewer connection, you’re mapping your drainage system in real time. This visual record proves far more valuable than any guess or assumption. When you’ve reached the extent of your accessible camera run, either because you’ve hit the main sewer or because the blockage prevents further progress, begin your withdrawal. Pull the camera back steadily, watching the monitor as you retrace your route. This return journey often reveals details you missed during the forward push.
Patience during camera insertion and navigation prevents equipment damage and ensures you capture complete, accurate footage of your drainage problems.
As you withdraw completely, clean your camera immediately. Drain environments are not hygienic spaces. Residue left on the camera head and cable damages the equipment over time. Use a damp cloth to clean the external surfaces, allowing moisture to dry completely before storage.
Pro tip: Pause regularly during your survey to take mental or written notes of the cable length you’ve deployed, marking significant findings like blockages or damage on your notes, as this information helps any professional contractor understand exactly where problems exist without repeating the survey.
Step 4: Record footage and note key findings
Your survey is only valuable if you capture and document what you’ve discovered. Recording footage and taking detailed notes transforms raw observations into actionable intelligence that tells you exactly what’s wrong with your drainage system and what needs to happen next. This documentation becomes your reference point for deciding whether you can resolve the problem yourself or need professional intervention.
Start recording from the moment your camera enters the first inspection chamber. Most CCTV systems include built-in recording functions accessed via your monitor controls. Check your system’s recording settings before you begin, ensuring the resolution is set to capture fine details rather than grainy, unusable footage. You want clarity sharp enough to identify blockage types, root ingress patterns, and pipe damage that might not be obvious in real time. Press record and keep the camera recording throughout your entire survey journey, from initial insertion through to complete withdrawal. This continuous footage creates a complete record of your drain system’s condition.
As you navigate through the pipes, pause periodically to document specific findings. When you encounter a blockage, stop the camera and take a moment to observe before pushing forward. What are you looking at? Is it compacted grease, matted tree roots, debris accumulation, collapsed pipe sections, or a combination of problems? Write these observations down or make mental notes you’ll transfer to paper immediately after the survey. Note the approximate cable length when you identified each problem, as this tells you exactly where in your drain system the issues sit. A blockage at 15 metres from your starting chamber is fundamentally different from one at 45 metres, and this precision matters for professional drainage contractors.
Recording footage should be stored securely and documented accurately to ensure compliance with data protection and safety regulations. Even though you’re inspecting your own property, proper documentation habits establish good practice and create records that prove invaluable if you ever need to engage professional drainage services or make insurance claims.
Create a simple observation sheet before starting your survey. You don’t need anything fancy, just a way to systematically record what you’re seeing. Consider noting these key elements as you progress:
- Starting location which inspection chamber you began from
- Cable deployment distance how far you’ve pushed at key observation points
- Blockage type and severity grease, roots, debris, or structural damage
- Blockage location the cable length when you first encountered obstruction
- Pipe condition cracks, fractures, collapsed sections, or patches
- Root ingress indicators if present, how extensive the root damage appears
- Previous repairs evidence of earlier work such as relining or patching
- Water level and sediment if standing water or silt accumulation exists
As you withdraw your camera, continue recording and noting any additional observations. You often spot details during withdrawal that weren’t obvious during insertion. The return journey sometimes reveals the blockage extent more clearly or shows additional damage you missed initially. Don’t rush this part, as your notes during withdrawal frequently contain critical information.
Once you’ve completed your survey, immediately review your footage. Don’t wait days before looking at what you’ve recorded. While everything is fresh in your mind, watch the full recording and supplement your written notes with timestamps or cable length references for major findings. This fresh review often clarifies things that seemed unclear during live viewing. You might realise that what looked like a solid blockage is actually compacted grease that could respond to hot water treatment, or you might identify structural damage indicating professional intervention is necessary.
Clear, detailed footage and comprehensive notes transform a raw CCTV survey into an invaluable diagnostic tool for resolving your drainage problems.
Store your footage securely. If you’re recording to a memory card or USB device, keep multiple copies in different locations. Digital footage can be lost to equipment failure, so redundancy matters. Label your recordings clearly with the date and property address. If you eventually hire a professional drainage company, they’ll want to see your footage and your notes, and clear labelling makes this handover seamless.
Your notes should answer the core questions that determine your next actions. What is blocking the drain? Where exactly is the blockage located? How severe is it? Are there additional problems beyond the primary blockage? Is the pipe structure itself compromised? Answers to these questions determine whether you attempt removal yourself using drain rods or a drain jetting service, whether you need professional excavation, or whether relining might be necessary. Comprehensive documentation through recorded footage and detailed notes supports accurate reporting and informed decision-making about your drainage system’s future.
Pro tip: Create a simple diagram of your property’s drainage layout with inspection chamber locations marked, then annotate it with your survey findings including blockage locations and pipe damage positions, creating a visual reference guide that proves invaluable for explaining problems to contractors or remembering exact locations if blockages recur.
Step 5: Review results to confirm drain condition
Now comes the analytical phase. You’ve captured footage and made notes, but raw data means nothing until you actually review it carefully and interpret what you’ve discovered. This review transforms your survey from a collection of observations into a clear understanding of your drain’s actual condition, what problems exist, and what action you need to take next.
Set aside dedicated time to watch your entire recorded footage in full. Don’t skim it or fast-forward through sections. Drain problems reveal themselves through careful observation, and rushing this review means missing details that could affect your decisions. Watch in a comfortable environment where you can pause, rewind, and take notes without distractions. As you watch, cross-reference your recorded observations against your written notes. Do your notes accurately capture what you’re seeing on screen? Did you miss anything during the live survey that’s now obvious on playback? Add supplementary notes as you review, filling gaps in your initial documentation.
Focus on identifying the blockage type and severity. This distinction matters enormously for determining your next steps. Compacted grease, for example, sometimes responds to hot water jetting or enzymatic treatments, whilst tree roots require mechanical removal or professional intervention. Debris accumulation might clear with drain rods, but collapsed pipe sections demand professional excavation and replacement. Watch your footage carefully, looking for these indicators. Grease appears slick and shiny, often with a yellowish tinge. Tree roots look dark and fibrous, sometimes filling substantial portions of the pipe. Debris includes leaves, soil, stones, or household waste. Collapsed sections show the pipe structure itself broken, crushed, or partially closed.
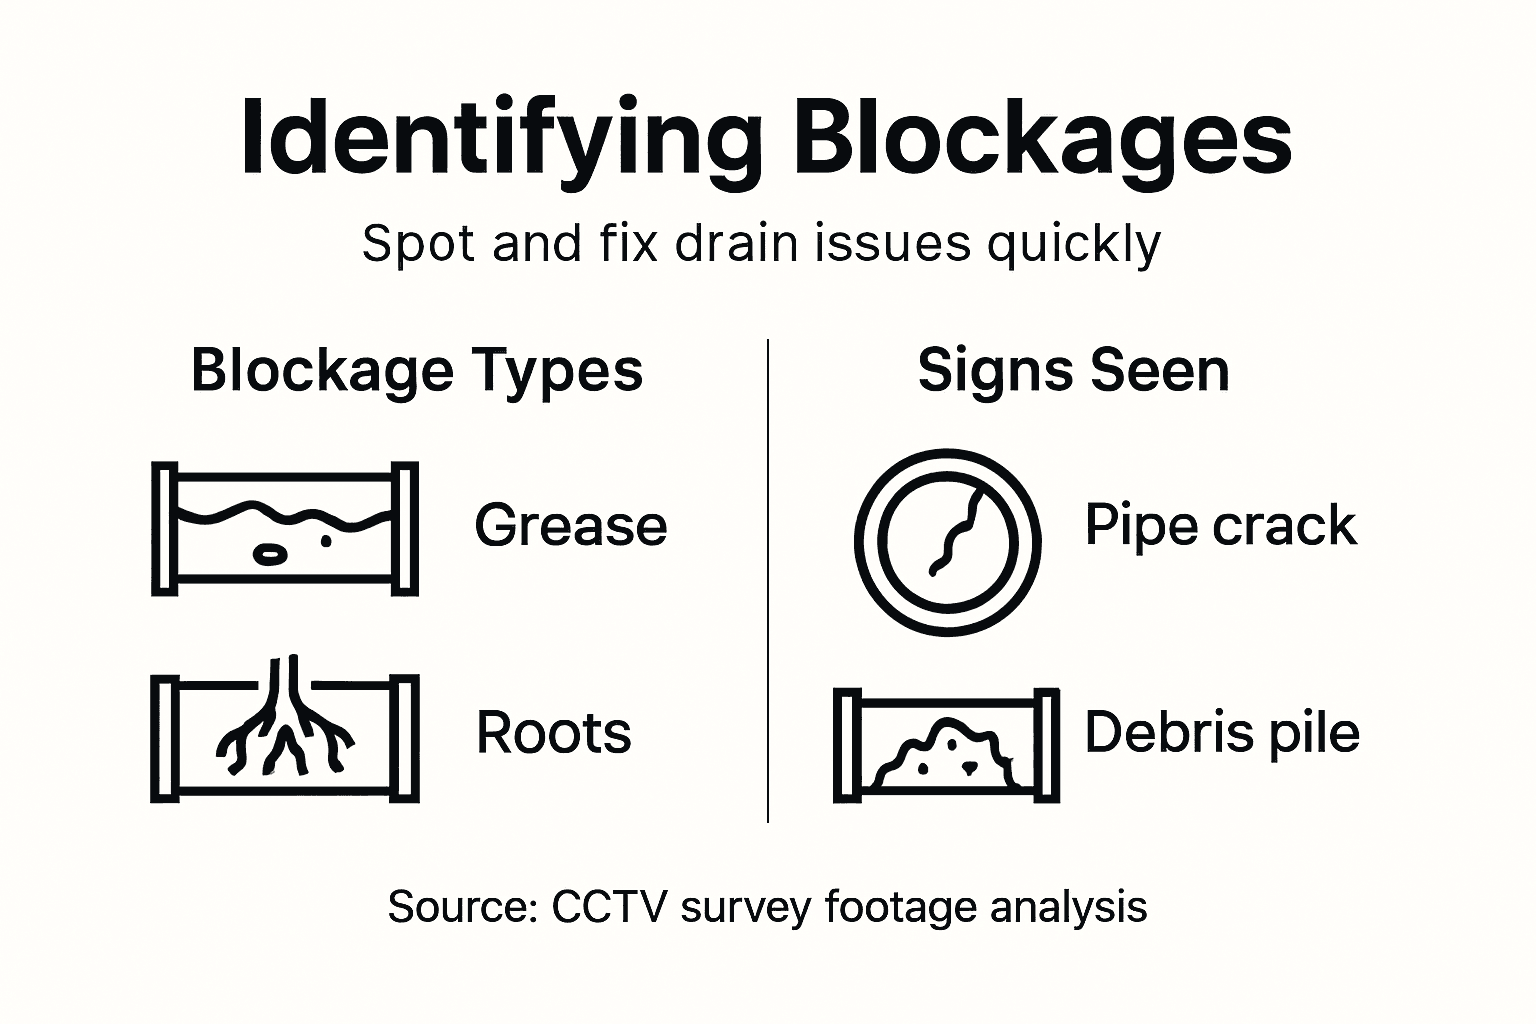
Here’s a quick overview of common drain blockage types and corresponding next steps:
| Blockage Type | Visual Clues on Footage | Recommended Action | Can Homeowner Fix? |
|---|---|---|---|
| Grease Build-up | Shiny, yellowish deposits | Hot water or enzymatic cleaner | Usually possible |
| Tree Root Ingress | Dark, fibrous masses | Mechanical root cutting needed | Rarely advisable |
| Debris Accumulation | Leaves, silt, stones visible | Drain rods or water jetting | Sometimes possible |
| Collapsed Pipe | Pipe misshapen or crushed | Excavation and repair required | Professional only |
| Standing Water | High water level, little flow | Identify cause then clear blockage | Depends on cause |
Determine the precise location of each problem by referencing your cable length notes. If you documented finding a blockage at 25 metres from your starting chamber, you now know exactly which inspection point to access if professional drainage work becomes necessary. Multiple blockages require separate documentation, as they might have different causes and solutions. You might discover roots at 20 metres and grease at 40 metres, representing two distinct problems requiring different treatment approaches.
Assess the overall pipe condition beyond blockages. Look for cracks, fractures, or structural damage that indicates aging pipework or previous failures. Observe any evidence of previous repairs such as patching or relining work. Note any instances of root ingress, as this suggests ongoing problems that might recur even after the current blockage clears. Document water levels and sediment accumulation, as excessive buildup indicates poor drainage efficiency regardless of whether a complete blockage exists. These observations paint a complete picture of your drainage system’s health.
Professional assessment of CCTV survey results should verify blockage locations and confirm the drain condition against regulatory standards and best practices, ensuring accurate recommendations for remedial action. Consider how your findings compare to what you expected. Did the blockage surprise you by its location or severity? Are there problems you hadn’t anticipated? This analysis helps you understand whether the blockage was a one-off event or symptomatic of systemic drainage issues.
Create a final summary document consolidating your findings. This becomes your reference for decision-making and can be shared with professional contractors if needed. Your summary should address these core elements:
This summary compares professional and DIY drain surveys for homeowners:
| Aspect | DIY Survey | Professional Survey |
|---|---|---|
| Equipment Cost | Initial investment required | Included in service fee |
| Technical Knowledge | Learning curve for operation | Trained operator provided |
| Diagnostic Accuracy | Depends on user skill | Consistently reliable |
| Data Documentation | Requires self-preparation | Detailed report supplied |
| Regulatory Compliance | Homeowner responsibilities | Contractor complies |
- Primary blockage type what material or obstruction is blocking the drain
- Blockage location the distance from your access point in metres
- Blockage severity whether it’s partial or complete obstruction
- Secondary issues any additional blockages, roots, or damage beyond the primary problem
- Pipe condition notes on structural integrity, cracks, or previous repairs
- Root ingress evidence if present, how extensive and what areas are affected
- Sediment and water levels observations about accumulated debris or standing water
- Overall system assessment your conclusion about whether this is acute blockage or chronic drainage failure
Now ask yourself the critical question: can you resolve this yourself, or does this require professional intervention? Grease blockages might respond to hot water treatment or enzymatic products. Debris might clear with drain rods. However, tree root ingress, collapsed pipes, extensive damage, or blockages you cannot locate confidently all suggest professional help is necessary. There’s no shame in calling specialists. Attempting to force solutions on problems beyond your scope risks equipment damage, property damage, or incomplete resolution.
Thorough review of your CCTV footage and careful analysis of findings reveals not just what’s wrong, but whether you can fix it yourself or need professional expertise.
Your survey results answer the fundamental question: what exactly is wrong with your drain? Armed with this knowledge, you can make informed decisions about solutions, costs, and timelines. You’re no longer working from guesses or assumptions. You have visual evidence and documented data supporting whatever action you choose to take next.
Pro tip: Save your completed summary document and recorded footage to cloud storage or multiple external drives, creating redundant backups that protect your investment in the survey and preserve the information indefinitely for future reference or professional consultation.
Take Control of Your Drainage with Expert CCTV Survey Support
Identifying and resolving drain blockages can be overwhelming, especially when dealing with Poole’s unique and ageing drainage systems. If you have followed the detailed steps for a drain CCTV survey but face challenges with locating blockages, interpreting footage, or deciding the best course of action, you are not alone. Common pain points like complicated root ingress, hidden debris, or damaged pipes require precise expertise to prevent costly damage and ensure lasting solutions.
At Blocked Drains Poole, we understand the critical importance of thorough inspection and accurate diagnosis. Our professional CCTV survey services complement your efforts by delivering clear, expert analysis and tailored drain cleaning, repair, or relining solutions designed specifically for the Dorset region’s older pipework. Whether you need fast emergency unblocking or a comprehensive drainage system assessment, our trusted team provides transparent pricing with no call-out fees and quick 24/7 response for peace of mind.

Stop guessing and start solving with confidence. Trust Blocked Drains Poole to turn your DIY survey findings into effective action. Contact us today to book a professional CCTV drain inspection or arrange prompt blockage clearance. Don’t wait until small issues become expensive problems. Take the next step now for reliable, local drainage expertise.
Frequently Asked Questions
What equipment do I need for a Drain CCTV Survey?
To conduct a Drain CCTV Survey, you’ll need a high-resolution camera designed for drain inspections, a reliable lighting system, and a durable cable reel with push rod. Ensure you also have monitoring equipment to view and record the footage in real time.
How do I find access points for my Drain Survey?
Locate inspection chambers or manholes around your property, which are usually slightly raised or sunken. Identify these access points before starting your survey to ensure you can successfully insert the CCTV camera into your drainage system.
What should I do if I encounter a blockage during the survey?
If you encounter a blockage while navigating the drain, stop immediately, and document your observations. Assess the blockage type, and note its location to determine whether to attempt a DIY solution or call a professional for help.
How can I ensure my survey footage is useful for future reference?
Record continuously from the moment you start your survey, ensuring that all findings are documented clearly. Create a summary document including blockage types and locations to serve as a reference point for any necessary follow-up actions.
What are common types of drain blockages I might encounter?
Common blockages include grease accumulation, tree root ingress, debris buildup, and collapsed pipe sections. Identifying the type and severity of the blockage is essential for determining the appropriate next steps.
How do I clean my CCTV equipment after a drain survey?
Immediately after completing your survey, clean the camera head and cable with a damp cloth to remove any residue from the drain environment. Allow the equipment to dry completely before storing it securely to maintain its functionality.